

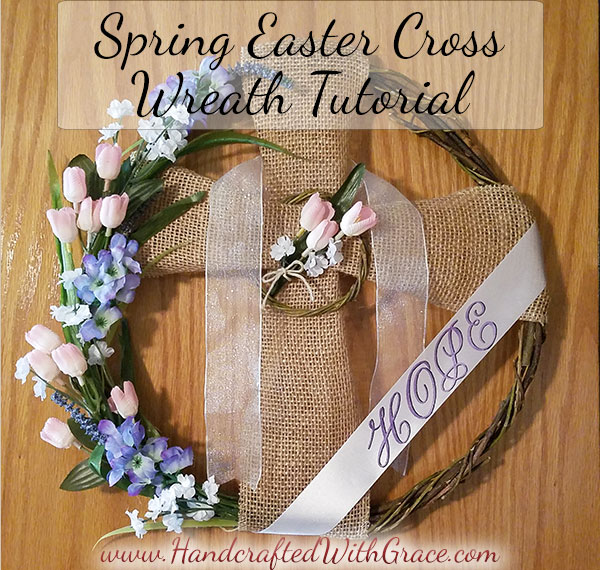
Easter is almost here and with the beautiful memorial of Christ’s sacrifice for all of us I wanted to share with you a tutorial on making this Spring Easter Cross Wreath. The design of the wreath symbolizes what I feel is representative of Easter and Christ’s sacrifice for me. When this design first came to me I knew it had to have a cross and a crown of thorns for Jesus’ crucifixion and death, a cloth for the burial cloths left in the tomb at the resurrection, flowers for life anew, and the word hope because that is what Jesus gives me.
Now this is just one design, and I am sure you could come up with elements in your design that will differ from mine. I hope you take the time to think about your design so that it fits what Easter means to you. If you want to make one just like mine, you are more than welcome to!
Now on to the Spring Easter Cross Wreath Tutorial…
Supplies:
1 Large Willow Wreath (You can find the tutorial to make your own Willow Wreath here.)
1 Small Willow Wreath (Size depends on width of Burlap Ribbon)
Burlap Ribbon (Length depends on size of Large Willow Wreath)
Floral Stems (Pictured are from Dollar Tree – 3 bundles)
Various Ribbons (One satin ribbon for “Hope” banner ribbon)
Acrylic Paint (For optional “Hope” banner ribbon)
3-4 Tan-Colored Pebbles (Sneaky Tip see below 😉 )
Tools: Scissors, Wire Cutters, Hot Glue Gun, Heavy Duty Glue, and Paint Brushes.

Step 1:
Since I wanted to incorporate the word “Hope”, and you may not want to you can skip to Step 2 if you would like. Otherwise, you can paint anything you want on a piece of satin ribbon so that you can have a banner like mine.
Print out your design and tape the ribbon down over the top of the design. Paint using standard acrylic paint or fabric paint if you prefer.

As you can see below, my paint brush is extremely small so I could add a shadow to the lettering and make it stand out. You can get as detailed as you would like to.

Step 2:
Layout the burlap ribbon so that you can see where you want the center of the cross to go. Pinch the center of the burlap ribbon where it crosses so you will be able to tell where to hot glue the burlap ribbon together.

Flip the cross over. On the back side of each burlap ribbon fold the ribbon so that the edges are almost to the center, then hot glue the two pieces together as seen below. This will give your cross a smaller center for the “crown of thorns” which will be added next.

Step 3:
Slide one side of your burlap cross through the small wreath (crown of thorns). Hot glue into place and add embellishments of your choosing.

Step 4:
Line up the burlap cross onto the large willow wreath and hot glue the TOP, and BOTH SIDES ONLY. Leave the bottom of the cross unattached so you can glue the floral stems underneath the bottom of the cross. When hot gluing the cross in place make sure to wrap the burlap around the wreath and trim off any excess material.

Step 5:
Layout the floral stems so you can test the placement before you start hot gluing them in place. Start at the top when hot gluing so that the flowers of the next bunch cover the stems of the first bunch. This will give a nice layered look to the flowers.
I bent my floral stems so they would match the curvature of the wreath and then cut off any excess stem length. Make sure to glue them in place well. You don’t want to have flowers falling off.

Step 6:
Once the floral stems are all attached, hide the bottom stems with the bottom of the burlap cross. Simply wrap the bottom of the cross around both the stems and the wreath and hot glue in place.

Step 7:
Add the rest of your embellishments like the banner ribbon or the “cloth” ribbon by hot gluing yet again.
Sneaky Tip:
My wreath was heavier on one side due to the flowers. Every time I tried to hang the wreath it would tilt so, I glued some small tan pebbles on the back side of the wreath so that they were hidden on the front by the burlap cross and the tilting problem was solved. The pebbles can’t be seen but give the light side just the right amount of weight.
I suppose the pebbles could symbolize the stone that was rolled back from the tomb 🙂

Don’t forget your hanger in the back of the wreath. You can use wire, a piece of ribbon or whatever you would like depending on the hook that you want to hang the wreath on. I chose to just slip the wreath over a Command Strip Hook.
What a beautiful way to express what Easter means to you and decorate your home for Spring.
I would really appreciate messages on Facebook, Instagram or in the comments below on what you used and what the elements symbolize for you!! I bet your designs will be stunning and meaningful.
God Bless each and every one of you and Happy Crafting!